Hướng dẫn cách tạo QR code thanh toán cho đơn hàng trên WooCommerce?
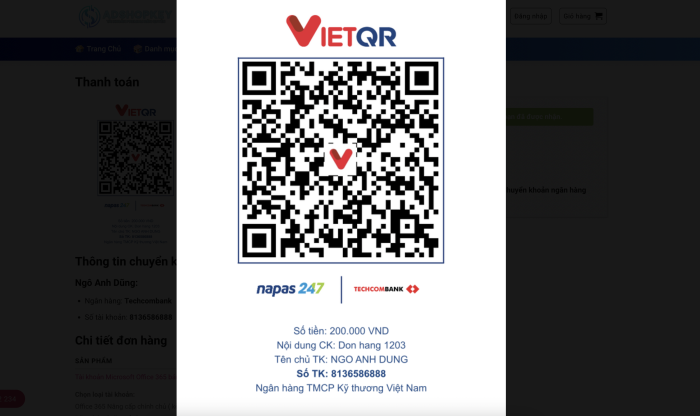
Hình ảnh Demo:
>> Cách tạo mục lục trong WordPress?
Mục Lục
1. Cách tạo QR code thanh toán cho đơn hàng trên WooCommerce?
Bước 1: Cấu hình trên WooCommerce?
Truy cập vào WooCommerce -> Cài đặt -> Thanh toán -> Chuyển khoản ngân hàng
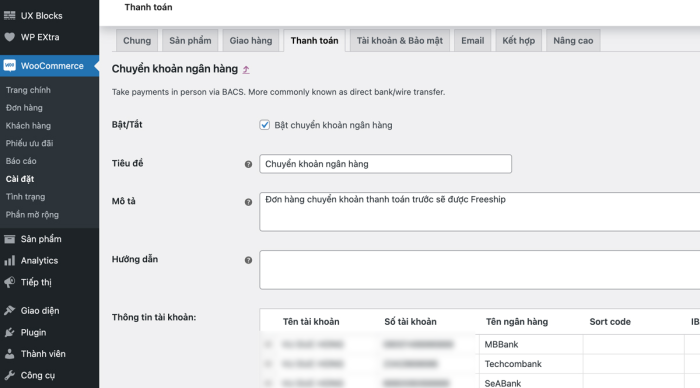
Điền thông tin tài khoản vào các trường theo mẫu như trên
- Tên tài khoản: Viết hoa toàn bộ, không dấu (viết thường, có dấu vẫn nhận)
- Số tài khoản: Viết liền
- Tên ngân hàng: Viết liền (chữ hoa, thường đều được)
Bước 2: Code hiển thị mã QR thanh toán?
Tiếp theo, sao chép đoạn code sau và đưa vào file functions.php.
add_action('woocommerce_thankyou_bacs', function($order_id){
    $bacs_info = get_option('woocommerce_bacs_accounts');
    if(!empty($bacs_info) && count($bacs_info) > 0):
        $order = wc_get_order( $order_id );
        $content = 'Don hang ' . $order->get_order_number(); // Nội dung chuyển khoản
    ?>
        <div class="vdh_qr_code">
	    <?php foreach($bacs_info as $item): ?>
	    <span class="vdh_bank_item">
	        <img class="img_qr_code" src="https://img.vietqr.io/image/<?php echo $item['bank_name']?>-<?php echo $item['account_number']?>-print.jpg?amount=<?php echo $order->get_total() ?>&addInfo=<?php echo $content ?>&accountName=<?php echo $item['account_name']?>" alt="QR Code">
	    </span>
	    <?php endforeach; ?>

            <div id="modal_qr_code" class="modal">
	        <img class="modal-content" id="img01">
	    </div>
        </div>

	<style>
	    .vdh_qr_code{justify-content:space-between;display:flex}.vdh_qr_code .vdh_bank_item{width:260px;display:inline-block}.vdh_qr_code .vdh_bank_item img{width:100%}.vdh_qr_code .img_qr_code{border-radius:5px;cursor:pointer;transition:.3s;display:block;margin-left:auto;margin-right:auto}.vdh_qr_code .img_qr_code:hover{opacity:.7}.vdh_qr_code .modal{display:none;position:fixed;z-index:999999;left:0;top:0;width:100%;height:100%;background-color:rgba(0,0,0,.9)}.vdh_qr_code .modal-content{margin:auto;display:block;height:100%}.vdh_qr_code #caption{margin:auto;display:block;width:80%;max-width:700px;text-align:center;color:#ccc;padding:10px 0;height:150px}.vdh_qr_code #caption,.vdh_qr_code .modal-content{-webkit-animation-name:zoom;-webkit-animation-duration:.6s;animation-name:zoom;animation-duration:.6s}.vdh_qr_code .out{animation-name:zoom-out;animation-duration:.6s}@-webkit-keyframes zoom{from{-webkit-transform:scale(1)}to{-webkit-transform:scale(2)}}@keyframes zoom{from{transform:scale(.4)}to{transform:scale(1)}}@keyframes zoom-out{from{transform:scale(1)}to{transform:scale(0)}}.vdh_qr_code .close{position:absolute;top:15px;right:35px;color:#f1f1f1;font-size:40px;font-weight:700;transition:.3s}.vdh_qr_code .close:focus,.vdh_qr_code .close:hover{color:#bbb;text-decoration:none;cursor:pointer}@media only screen and (max-width:768px){.vdh_qr_code .modal-content{height:auto}}
	</style>

	<script>
	    const modal = document.getElementById('modal_qr_code');
	    const modalImg = document.getElementById("img01");
	    var img = document.querySelectorAll('.img_qr_code');
	    for (var i=0; i<img.length; i++){
	        img[i].onclick = function(){
		    modal.style.display = "block";
		    modalImg.src = this.src;
		    modalImg.alt = this.alt;
		}
	    }
	    modal.onclick = function() {
	        img01.className += " out";
		setTimeout(function() {
		    modal.style.display = "none";
		    img01.className = "modal-content";
		}, 400);
	    }
	</script>
    <?php
    endif;
});
Save lại và tiếp theo bạn đặt 1 đơn hàng Test thử:
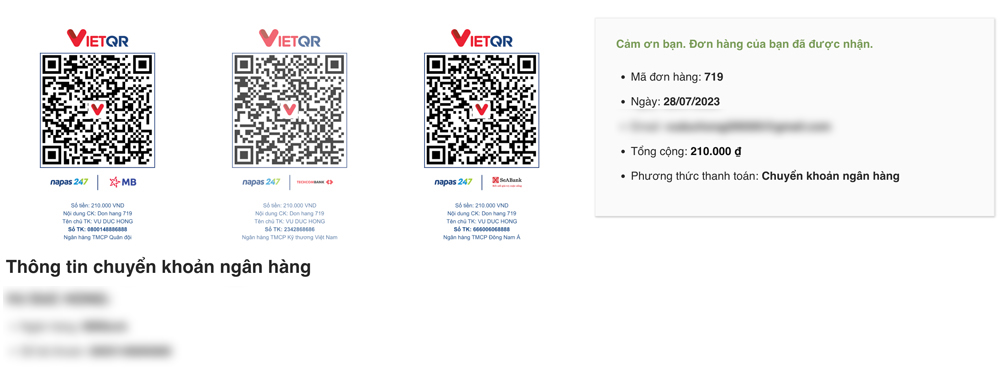
Một số lưu ý về đoạn code:
Trong mã QR Code đã điền sẵn tất cả các thông tin, bao gồm:
- Tên ngân hàng
- Số tài khoản
- Chủ tài khoản
- Số tiền thanh toán bằng đúng giá trị đơn hàng
- Nội dung chuyển khoản là mã đơn hàng (cái này có thể thay đổi tuỳ chỉnh đoạn code trên)
2. Cuối cùng:
Trên đây là bài viết của mình là: Hướng dẫn cách tạo QR code thanh toán cho đơn hàng trên WooCommerce? – chúc các bạn thành công.
